The Shower Install
Okay, time to install the shower. This will probably be my longest post but I wanted to keep it all together. I was told we could install this shower in a weekend and we did! Read on to see how easy it was.
Everything was neatly in a box so we opened the box and familiarized ourselves with everything. They also have a shower install video on the www.americanbathfactory.com website which is helpful especially if you're a visual learner (like me). The first order of business was to be sure everything was clean around the drain.
Everything was neatly in a box so we opened the box and familiarized ourselves with everything. They also have a shower install video on the www.americanbathfactory.com website which is helpful especially if you're a visual learner (like me). The first order of business was to be sure everything was clean around the drain.
Next, we lined up the drain with the pan (that's my husband Arnold).
You might notice that we put in the steam generator at the same time. We wanted to get it connected before we sealed up the wall. Once the drain is lined up the pan just fits right in. We used silicone (I think they are all waterproof) underneath just to secure it. This is also the time to set the frame for our Shampoo Shelf. We used some of the cardboard from the shower kit box to cover the shower pan since we didn't want to spend time scraping off silicone or paint.
Since we shortened a wall, we also had to reframe it before we could do anything else. Then we started putting up the hardibacker (cement board) which goes up just like drywall except we used Rock-On Cement Screws. We also measured and cut-out the space for the Shampoo Shelf.
Since we shortened a wall, we also had to reframe it before we could do anything else. Then we started putting up the hardibacker (cement board) which goes up just like drywall except we used Rock-On Cement Screws. We also measured and cut-out the space for the Shampoo Shelf.
The next step was to place the Sistine Stone panels (yes, I said "panels") which is just too easy! ☺ Our panels were two (2) across and three (3) down. Since we wanted the decorative trim, you'll notice that it's included in the panel (Yay!). We placed plenty of silicone on the wall AND the panel then placed them into the shower.
After we finished the bottom section, we did the same for the top section. We needed to trim the top panel because of the window so we used a Makita 4" Disc Grinder with an all-purpose blade and trimmed off the top and the cut-out space for the Shampoo Shelf.
Once all the panels were up we used silicone to put the Shampoo Shelf in place.
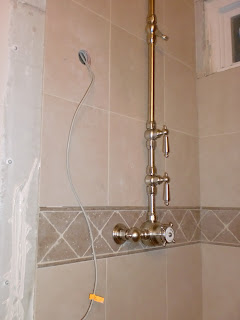
And since all the panels were up, this was a good time to connect the shower faucets. We chose the Thermostatic Wall Mount with the Hand-held Shower (FYI, I am SO glad we got the Thermostatic! We set the shower temperature that we prefer and never have to touch it again unless we want to change the temperature! Fabulous!). We also drilled the hole for the steam shower temperature controller.
Next, we were ready to insert the bullnose edges around the shower. Once again, silicone to the rescue! We just started at the bottom and worked our way up...easy as pie! Some of the bullnose needed trimming and we trimmed them the same way as we did the panels. Since the window needed bullnose on the top as well as the bottom, we used Styrofoam (also found in the shower kit used to protect the product during shipping) to hold it in place until the silicone dried.
Now we were ready to install the glass doors. We attached the hinges with the screws that were provided to the glass and then made sure the glass was level (we just placed a piece of wood underneath the glass), marked the location for the screws, drilled the holes and then screwed the hinges onto the bullnose.
The bottom hinge first and then the top hinge.
On the other side, the bullnose included a groove (important to remember when you're installing the bullnose) to which we added silicon and then inserted the glass.
At this point most folks would be finished with the shower and ready to grout. For our grout, we used ColorFast Siliconized Acrylic Tile and Grout Linen Nonsnd 10.
Because we decided to include a steam shower we still needed to adjust the ceiling since a steam shower ceiling should be at a slight angle (about a half inch). That way, the water will be diverted from the outside wall. We ordered an extra piece of glass for the top and extra tiles and bullnose to seal our shower and hold the steam in. The folks at American Bath Factory helped us to determine what we would need. While we waited for the glass to come in, we closed up the wall where our steamer was located leaving a space to get to the steamer when necessary.
As you can see, we used Styrofoam again (plenty in the packing materials provided) to hold the tiles in place, this time for the ceiling. Amazing stuff, that styrofoam! ☺ Don't worry about that big hole in wall, we found a 15" x 15" SpringFit Access Panel at Home Depot before we cut the hole. Now we can get to the steam unit if necessary.
That's a wrap for the shower install. I can't believe we did it in one weekend! The next blog will include the top glass, the paint, and the remaining tile work. There's still plenty of work to do so I hope you'll check back.
Labels: bullnose, drain, faucet, generator, glass, glass doors, grout, hand-held shower, hinge, install, Makita, silicone, Sistine Stone, temperature, Thermostatic, video


0 Comments:
Post a Comment
Subscribe to Post Comments [Atom]
<< Home